Decision Trees
RiskyProject allows the user to perform an analysis of different
scenarios using decision trees. Decision trees can be created based
on RiskyProject’s project schedule and presented using Vanguard’s
Decision Pro software (see www.vanguardsw.com). RiskyProject can
export data to the text files and then used as an input in Decision
Pro. Alternatively, Decision Pro can be launched directly from
RiskyProject from the menu or by clicking the toolbar button.
The best way to explain how the integration between RiskyProject and
Vanguard works and how you create a decision tree is by analyzing an
example. The sample that will be used in this example
(RP_Decision.alm) is available in the RiskyProject sample files.

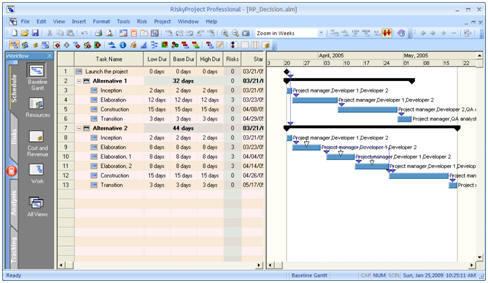
This example represents a high-level schedule for a software
development project. The schedule includes two alternatives. Both
alternatives include four different phases of the project:
inception, elaboration, construction, and transition. The difference
between first and second alternatives is that in the second
alternative, the elaboration phase includes three iterations. The
duration of each iteration phase is 8 days; therefore, the duration
of entire elaboration phase is 24 days total. The duration of the
elaboration phase in the first alternative is 12 days. Each task has
assigned resources. Variable costs for the task are calculated based
on the rate of each resource. Fixed costs are not used for this
example.
The purpose of a decision tree analysis is to determine which
alternative should to be taken based on minimum cost or minimum
duration. Cost is calculated as a sum of variable and fixed cost of
all tasks for the alternative. Duration is calculated as a sum for
duration of all tasks for the alternative._
Any project schedule
can be converted to a decision tree. However, it is recommended to
perform decision tree analysis for the project schedule with clear
defined alternatives. Otherwise, decision tree can be very complex
and will not help to identify better course of actions._
Decision Nodes
To convert the project schedule to a decision tree, we need to
identify uncertainties in the project schedule and express them as
event (chance) nodes or decision nodes. Event (chance) nodes and
decision nodes can appear if there is a branching in the schedule.
In other words, if task has two or more successors, it becomes an
event (chance) or decision node of the decision tree. The schedule in this example has uncertainties that are related to
the iterations of elaboration phase for the second alternative.
After the completion of first elaboration iteration, there is 50%
chance that next task will be construction and 50% chance that next
task will be the elaboration iteration two (task “Elaboration 1”).
In addition, after the completion of second elaboration iteration,
there is 50% chance that next task will be construction and 50%
chance that next task will elaboration iteration three (task
“Elaboration 2”). Elaboration can be completed early because of the
efficient use of internal resources, knowledge of business and
product, etc.

Defining decision node types
All decision nodes must have at least two successors.
1. Double-click on the task ID of the task that you want to add a
decision node.
2. Click the Decision tab.
3. Select the decision node type (Decision,
Event, or End) option.
4. If you selected the Event (chance) node option,
you must enter the chance associated with each successor in the
Chance column. The Chances values do not
necessarily need to add up to 100% as RiskyProject will calculate a
normalized chance, which will be used in the decision tree.
• You cannot assign an event node to the task, where at least one
successor is a summary task.
• The default node type is a
decision node. Decision nodes will be assigned automatically to the
root of the schedules. All tasks of level one (upper level of the
project schedule), which do not have predecessors, will
automatically become alternatives.
• You can also use an end node for the task. Cost or duration
for the end node will represent the sum of all cost or durations for
all the successors.
• The Decision tab will not allow you to define node type for
a task that has one or no successors.
Exporting
a Decision Tree
When you launch Decision Pro directly, RiskyProject will determine
if Decision Pro is installed on the computer. If Decision Pro is not
installed, a message box will open which will direct you to the
Decision Pro web site.
When you export data to Decision Pro, you will need to specify some
parameters:
• The type of decision Tree do you need (based on cost or
duration)
• To reduce the size of decision tree, you can choose not to
display intermediate tasks. Intermediate tasks have one successor
and one predecessor.
Summary tasks will not be converted to nodes in the Decision Tree.
Successors and predecessors of summary tasks will become successors
and predecessors of their subtasks.
Launching Decision Pro
1. From the File menu, choose Export
> Decision Pro. This exports the
project data into a Decision Pro text file (extension .txt).
2. Select the Decision Tree type
depending upon the analysis you want to do:
• Minimize cost
• Minimize sum of task durations
3. Select Remove intermediate tasks for decision tree if you want to
limit the size of the decision tree hiding intermediate tasks.
4. Once you have made you selections, click OK.
RiskyProject will perform a Monte Carlo simulations (if the results
have not already been calculated).A decision tree can only be
generated based on the result of analysis in RiskyProject.
5. If required, you can modify the decision tree by right-clicking
on the diagram and selecting a command. In addition, you may need to
recalculate the decision tree. For more information about how to
work with the decision tree, read the Decision Pro documentation.

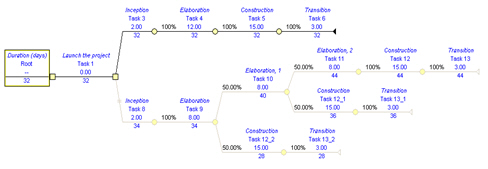
The decision tree above shows that Alternative 1 has
the lowest duration of 32 days and is a candidate for the project
plan. An analysis of the same project, but using cost as the value
measure can be implemented in a similar way, but the export to
Decision Pro should be done separately.
If you launched Decision Pro from within RiskyProject, when you
close it, you will be prompted to save a temporary file that was
used to create decision tree. If you did not change the decision
tree generated from RiskyProject, this step is not required as you
can regenerate the decision tree based on the project schedule at
any time.
When you created the original project schedule, you defined
uncertainties related to internal development issues for the project
team. These uncertainties are expressed in probabilities for chance
nodes, representing iterations in the elaboration phase for the
second alternative. However, you did not add any risks to the
alternative.
Viewing how risks affect the decision
tree
To see how risks will affect the decision tree, you will need to add
the risks to the project. Changes in requirements are one of the
greatest risks that software projects face
(RP_DecisionWithRisks.alm).
1. To account for this risk in the project, assign the risk
Requirements change to the elaboration phase in Alternative 1 and
for all the Elaboration iterations in Alternative 2. The result for
each iteration can be shown to the client; therefore, the risk of
“Requirements change” can be reduced on sequential iterations.
2. To analyze this risk in the decision tree, enter this risk in
Risk tab of Task Information dialog box for each elaboration task.
3. Perform another Monte Carlo simulations on the project and
generate a new decision tree:

This decision tree shows that alternative two (with elaboration
iterations) will be more effective in terms of duration. Therefore,
you can see that if we apply risks to the project schedule different
alternatives can be selected.
The last example shows that using a combination of risk analysis and
decision tree in tandem on the project schedule allows managers to
make informed decisions.
|
